“War is an area of
uncertainty; three quarters of the things on which all action in War is based
are lying in a fog of uncertainty to a greater or lesser extent.” - Carl von
Clausewitz
Mark asked for a
little more fog in the mission, so I happily unleashed the puppies of Carl’s
Dogs of Uncertainty!
Mission AAR here: http://bigfof.blogspot.com.au/2014/01/the-valley-of-fog-aar.html
Mission overview in context of campaign here: http://bigfof.blogspot.com.au/2013/06/malikastani-escalation-turn-4-battles.html
Following the reversal at Budgie Smuggler Hill the Hotakistani forces
fell back to regroup in a shallow valley to the NW. They then planned to bypass the Australian
defenses to the west. The Australians,
however, decided to preempt the next Hotakistani attack and pursued the
Hotakistani forces into the shallow valley.
Turns: 8
Victory Points: Battle of
Attrition, 5VP per Heavy vehicle, 2VP per KIA, 1VP per SW, 3VP for POW. Vehicle crews do not count towards VP.
Initiative: Australia has Initiative in Turn 1, from Turn 2 roll for initiative.
Initiative: Australia has Initiative in Turn 1, from Turn 2 roll for initiative.
Special Rules:
•
1/4 of the Hotakistani arrive as
reinforcements.
•
1/4 of Hotakistani units setup
visible (but are hidden if setup in concealing terrain), the remaining are
secretly marked on the map in compounds or camouflaged adjacent to a compound
wall. The secret units can only react to
AUSAF units if engaged before Turn 3 (must be spotted)
•
Hotakistanis that setup in fields may dig-in on TQ with -1 to roll.
•
Hotakistani armour must setup with 6” of each other as they are forming
up to attack
•
Hotakistani infantry and support must setup in depth (4” between units)
due to fear of artillery.
•
Hotakistani front line is a tree-lined shallow stream, double movement
cost, and TQ or bog. May make an
immediate TQ to unbog and continue movement at cost of 4”.
•
Other streams are small and dry.
•
Compounds are Hard Cover +1, and 4D8 strength
•
The reinforcement card units are setup onboard on Turn 1
•
Each side places five markers onboard for improved artillery
registration.
•
Hotakistanis can set up one forward position unit: a vehicle or squad 6”
to 18” from the AUSAF edge.
•
Hotakistanis can set up one 6”
wide and 2” deep hidden minefield between 12” and 30”
UN Forces
Heavy Artillery 155mm (Fatigue 4+ but with
Five Staff so Fatigue is 1+)
Australian Infantry
TQ8-MOR10 Fatigue 5+
Australian Heavy
Armour TQ8-MOR10 Fatigue 3+ Very Confident
Close Air Defense TQ8-MOR10 Fatigue 2+
Hotakistani Forces
Hotakistani
Infantry TQ8-MOR8-INI6 Fatigue 2+
Hotakistani Heavy
Armour TQ8-MOR8-INI6 Fatigue 5+ (Staff III->2+) Confident T-72 (1x T-80)
220mm Heavy Rocket Battery Fatigue 2+
220mm Heavy Rocket Battery Fatigue 2+
AA
What the Hotakistani
and Australian player did not know:
Australians flanking units (Reveal Turn 4): arrive within 6” NE
corner, but only arrive from Turn 4 on a TQ.
·
Bombardment (Reveal Turn 2): At the beginning of
Turn 2 the board is subject to a late poor bombardment 10 random hits, Heavy
Rocket Artillery Hotakistani, random direction from D8-D6 grid D8”. Following the bombardment maximum LOS is
reduced to 24” and optimum to 6” for Turn 2, and to 36” and 8” for Turn 3. After that it returns to normal. Units lost to the bombardment do not count
towards VP. Does not effect secret
units. All units within 12” of a impact
must roll Morale or be pinned.
·
Secret Units (Reveal Turn 3): Only 1/2 of the
Hotakistani force is actually setup on board, other setup units are written on
the map. Each time a invisible unit is
spotted or activated roll a D6 on a 4+ it is offboard. Any secret unit on Turn 3 is rolled for and
is either placed on board at its location or moved to offboard reinforcements. They start to arrive from
Turn 3 on the North edge (within 6” of the road). And the last 1/4 arrives within 6” of the SE
corner from Turn 3. All reinforcements
must pass a TQ to enter from Turn 3.
·
IED Markers (Reveal Turn 1). The artillery registrations are actually
potential IEDs. AP6/AT3(M). Each time a unit moves within 3” of one of
these locations roll a D6, on a score of 6 the IED explodes attacking that
unit. On a 1-3 the IED is removed with
no effect. On a 4 the IED marker remains
waiting of the next unit. On a 5 the unit
halts and the marker is removed.
·
Disgruntled Local Chief (Reveal Turn 1). The Local chief, and ex-Malikastani Colonel
with a hate for the AUSAF and Hots is placed in a random compound. At end of each turn his force will attack any
(closest) in LOS of the compound and will position to attack that unit. He begins HIDDEN. Leader x1 AK, RPGx1, x2 RPG (AP3/AT2(M)), x5
AK, Regular TQ8/MOR10. Any Hot units in this compound are moved to
offboard reinforcements.
·
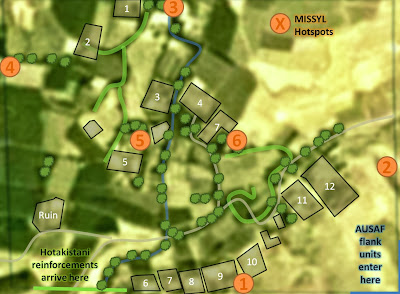
Malikastani Independent Spiritual Students Youth League (Reveal Turn
3). The MISSYL is a growing force in
Malikastani, led by a young charismatic leader whom preaches that the sight of
the beginning of the Apocalypse is in Malikastan. TQ6-MOR12 Irregular – Use 2nd
Reinforcement table. They never have
leaders. They always have their turn
last. They do not count towards VP.
So, basically, the Fog of War is implemented as hidden units, hidden units which both sides do not know do not exist, a artillery barrage, flank entry points which have moved and third force insurgents and warlords who are unfriendly to all foreigners.
So, basically, the Fog of War is implemented as hidden units, hidden units which both sides do not know do not exist, a artillery barrage, flank entry points which have moved and third force insurgents and warlords who are unfriendly to all foreigners.


No comments:
Post a Comment